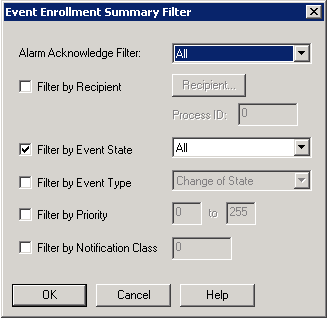
Event Enrollment Summary Filter
Where You Can Find the Dialog Box
From the View menu, select the Enrollment Summary Filter.
What You Can Do with the Dialog Box
The Event Enrollment Summary Filter dialog box allows you to edit the filters used by the Event Enrollment Summary view. You can select any combination of filters.
|
Field/Button |
Description |
|
Alarm Acknowledge Filter |
Click the drop-down arrow to select All, Acked, or not Acked. |
|
Filter by Recipient |
Check this box to activate the Recipient button and the Process ID field. |
|
Recipient |
Click this button to launch the Edit Recipient dialog box, which allows you to select the Device Instance number, the address, and the broadcast type. |
|
Process ID |
Enter the Process ID of the application in the BACnet device you are sending alarms to. |
|
Filter by Event State |
Check this box to select the event state by clicking the drop-down arrow and selecting All, OffNormal, Fault, Normal, or Active. |
|
Filter by Event Type |
Check this box to select the event type by clicking the drop-down arrow and selecting Change of Bitstring, Change of State, Change of Value, Command Failure, Floating Limit, Out of Range, Complex, Buffer Ready, Change of Life Safety, Extended, Buffer Ready 2, or Unsigned Range. |
|
Filter by Priority |
Check this box to select the priority. Enter the priority range from 0 to 255. |
|
Filter by Notification Class |
Check this box to select the notification class. Enter the notification class number. |
|
OK |
Saves the information and exits the dialog box. |
|
Cancel |
Cancels the function and exits the dialog box. |