Additional User Administration Procedures
Prerequisites:
- System Manager is in Engineering mode.
- System Browser is in Management View.
- Project > System Settings > Users is selected.
- An own created user group is available.
You are not logged on with a Windows account but as a local user.
- In the Users list, select a user.
- In the Change Password expander, enter a new password.
- Confirm the new password.
- Apply is enabled if the password matches.
- Click Apply.
NOTE: The password cannot be saved with .
.
- The new password is saved.
Scenario: For security reasons, the DefaultAdmin account must be disabled when handing over a project to the customer.
- There is an administrator user account available that has the same comprehensive rights as the DefaultAdmin account.
- You are not logged in as DefaultAdmin.
- In the Users list, select DefaultAdmin.
- Clear the Enabled check box.
- Click Save .
- The DefaultAdmin user is disabled and cannot log on to Desigo CC.

NOTE:
You can re-enable the DefaultAdmin account at any time with the appropriate user rights.
- In the Users list, select a user or use multi-select by pressing the CTRL or SHIFT key.
- Clear the Enabled check box for the user.
NOTE: When you use multi-select, the check box next to the last selected user takes on the master function. Checking or clearing it, checks or clears the check boxes of all selected users.
- Click Save .
- The user is disabled and cannot logon to Desigo CC.
- A history log entry is created for each disabled user.
NOTE:
You cannot disable the account you are logged on with.
- In the Users list, select a user.
- Change the desired settings for the user.
- Click Save .
- The user is modified.
Scenario: The user has entered an incorrect password multiple times. When he exceeds the number of logon attempts configured in the Attempts allowed field, the user account is locked for 5 minutes. To unlock his account, the user needs to wait for 5 minutes or contact the Desigo CC administrator to have his user account unlocked.
NOTE: After the waiting period of 5 minutes, only one logon attempt is possible. If an incorrect password is entered, the account will be locked for another 5 minutes.
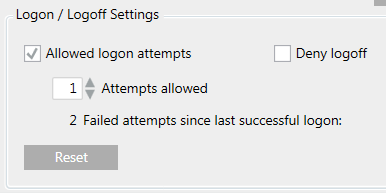
- You have the adequate level of Application Rights for the Security Configure application.
- In the Users list, select the locked user.
- In the User Configuration expander, select the Logon / Logoff Settings group box.
- Click Reset.
- Click Save .
- The user is unlocked.
An existing local user can be changed to a Windows user (or vice versa). The existing user settings are retained.
- In the Users list, select a user.
- Click Edit
 .
.
- Select one of the following user types:
- Desigo CC : see New Local User
- Windows: see New Local Windows User
- Click OK.
- Click Save .
- The user account is changed and you can log on to Desigo CC.
- Click the Users column header.
- Users are sorted alphabetically from A-Z.
- (Optional) Click the Users column header again.
- Users are now sorted alphabetically from Z-A.
- In the Users list, select a user.
- In the User Configuration expander, highlight the appropriate user group.
- Click Remove.
- Click Save .
- The user no longer has any rights from the unassigned user group.
- Click User with no groups
 .
.
- The users without user group assigned are filtered.
- In the Users list, select a user or use multi-select by pressing the CTRL or SHIFT keys.
- Click Delete
 .
.
- A confirmation message box displays with the number of selected users.
- Click Yes.
- The user is deleted and can no longer logon.
- A history log entry is created for each deleted user.
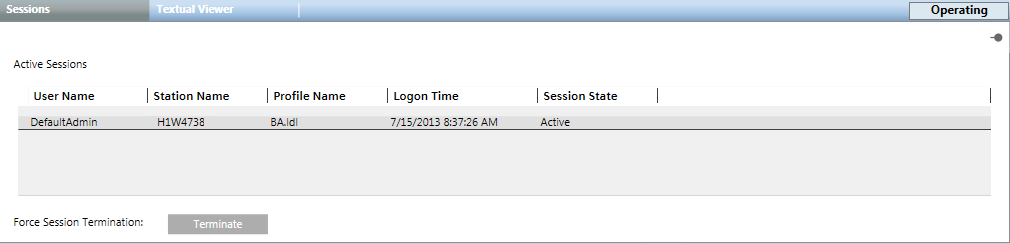
- Select the Sessions tab.
- All active sessions display with User Name, Station Name, Profile Name, Logon Time, and Session State.
- (Optional) Select a session and click Terminate to close an active session.
The domain name needs to be set once when first logging onto Desigo CC.
- Click the Extended Operation tab.
- Select the Default Domain Name property.
a. Enter the domain name, for example, DomainName\UserName.
b. Click Apply.
- Select the Extended Operation tab.
- Select the Session Timeout property.
a. The Session Timeout property shows the current value (Default: 10 min). Session timeout is a connection test between the server and the client and takes place every 30 seconds. The session is closed after the set period, if disconnected. During the set period, a Web Client can log off and logon again without user credentials being entered.
b. Click Apply.
The Single Sign-On Token Lifetime property defines the maximum accepted logon (not for every request) response time for creating a connection between the Application Viewer and a web application. In other words, if the Application Viewer sends a request to a web application, such as the BIRT server, the application has to respond within the set period of time. The request expires if there is no response within the set period.

- Select the Extended Operation tab.
- Select the Single Sign-On Token Lifetime property.
- The Single Sign-On Token Lifetime property displays the current value (default: 3 min).
- Enter the new value.
- Click Apply.
Scenario: In a distributed system, a local user must be promoted to a global user.
- In the master system, select Project > System Settings > Users.
- Select the Users tab.
- In the Users list, select a user.
- Click Promote
 .
.
- Click Yes.
- The promoted user has access to the distributed system.
Scenario: In a distributed system, a global user must be demoted to a local user.
- In the master system, select Project > System Settings > Users.
- Select the Users tab.
- In the Users list, select a user.
- Click Demote
 .
.
- Click Yes.
- The demoted user has access to the local system only.