Setting up the Web Service Interface
Scenario: You want to create a connectivity to a Website, the mobile app, Flex client or a 3rd party program.
Reference: For background information, see the reference section.
Workflow diagram:
Prerequisites:
- IIS is installed in accordance with the required operating system settings.
- The Web Service extension is installed.
- The project is created in SMC and started and is an active project.
Steps:
- In the SMC tree, select Projects.
- Select an existing project.
- Click Stop
 .
.
- A confirmation message displays.
- Click OK.
- Click Add to project
 .
.
a. In the Select Project Extensions dialog box, click the arrow next to Connectivity and select the Web Services check box.
b. Click OK.
c. Click Save .
.
- The Web Services Communication expander displays.
- The Web Services extension is installed.
- Click Edit
 .
.
- Click Next
 .
.
- The Web Services Communication expander displays.
- Select Communication and do one of the following:
- Secure Connection on one Computer
a. Under Web services port, enter the port number (Default: 8080).
- Secured Connection Between two Computers
a. Under Web services port, enter the port number (Default: 8443).
b. Under Host certificate, click Browse.
c. Select the appropriate certificate and click OK.
- Click Save Project .
- The protocol settings are saved.
- Click Start Project
 .
.

NOTE:
HTTP is insecure and vulnerable to man-in-the-middle and eavesdropping attacks which can let attackers gain access to sensitive information. Many organizations require certificates from third-party authorities instead of self-signed certificates to remain compliant with current regulations.
- IIS manager is installed and you have configured the necessary settings.
- (Recommended) You have deleted the default IIS website.
- Application Request Routing (ARR) is installed on your system. If the IIS settings are not set up correctly, the Application Request Routing may not be visible. Change the IIS settings and run the Desigo CC installer again.
- In the SMC tree, select Websites.
- Click the Management tab.
- Click Create Web site
 .
.
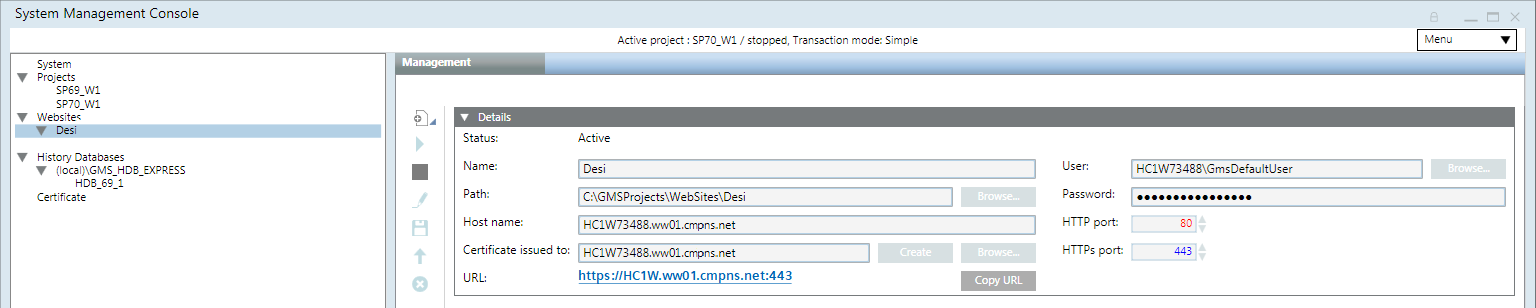
- In the Details expander, do the following:
a. In the Name field, enter a unique name for the web application.
b. In the Path field, browse to select a destination for the website. The default path is [installation drive:]\[installation folder]\[WebSites]\[Web site name].
c. In the User field, browse to select a user for the website.
d. In the Select User dialog box, select the user for the web application and enter the password.
NOTE: The web application must be a member of the IIS_IUSRS group. If you select a user that is not a member of the IIS_IUSRS group, SMC prompts you to add it.
e. Enter the password.
NOTE: Confirm the website/Web application user and password. If the password has changed, you must modify the website/Web application, and provide the most recent user password.
f. Change the port numbers if the default cannot be used.
g. Click Create to assign a certificate.
- Click Save .
- A confirmation message displays.
- Click OK.
- The data is validated on successful creation.
- The Details expander displays the new settings.
NOTE:
HTTP is insecure and vulnerable to man-in-the-middle and eavesdropping attacks which can let attackers gain access to sensitive information. Many organizations require certificates from third-party authorities instead of self-signed certificates to remain compliant with current regulations.
- In the SMC tree, under Websites, select the website.
- Click the Management tab.
- Click Create Web Services Application
 .
.
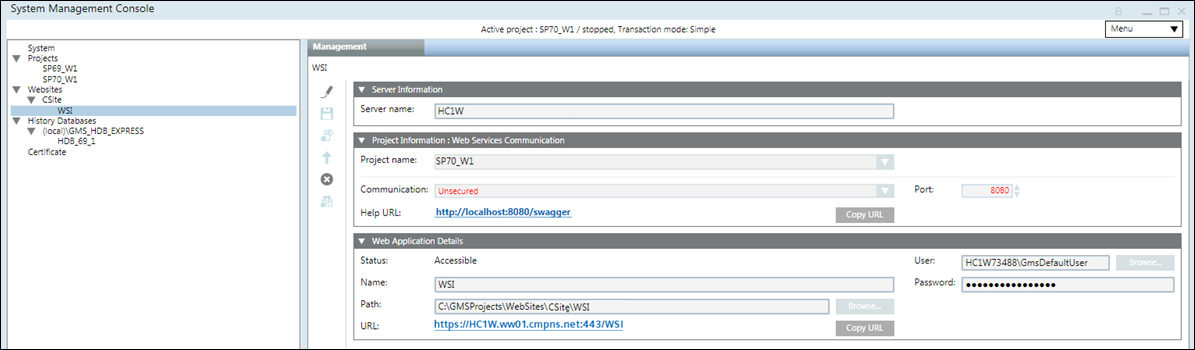
- In the Project Information expander, do the following:
a. From the Project Name drop-down list, select a project that you want to link to the web application.
b. (Optional) From the Communication drop-down list, select the communication type.
- In the Web Application Details expander, do the following:
a. In the Name field, enter a unique name for the web application.
b. In the Path field, browse to select a destination for the website. The default path is [installation drive:]\[installation folder]\[WebSites]\[Web site name].
c. In the User field, browse to select a user for the website.
d. In the Select User dialog box, select the user for the Web Service application and enter the password.
NOTE: The Web Service application must be a member of the IIS_IUSRS group. If you select a user that is not a member of the IIS_IUSRS group, SMC prompts you to add it.
e. Enter the password.
- Click Save .
- A confirmation message displays.
- Click OK.
- The data is validated on successful creation.
- The Web Service Interface Settings expander displays the new settings.
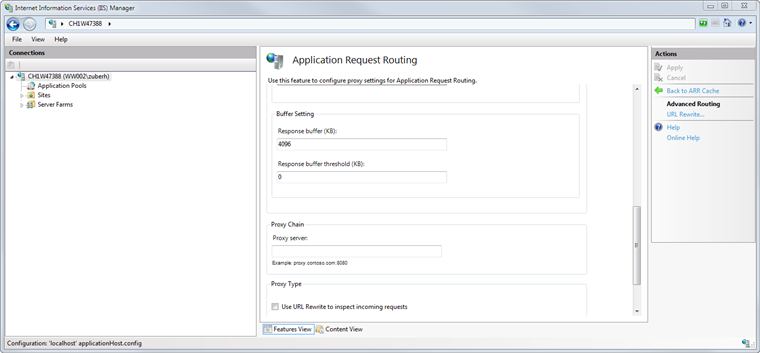
You want to verify the buffer settings for Application Request Routing (ARR), if WSI is not working.
- The Internet Information Services (IIS) Manager is open.
- In the Buffer Setting section, set the Response buffer threshold (KB) value to 0.
- In the Actions pane, click Apply.