Upgrading Server/Client/FEP Using the Silent Installation
Scenario: You have acquired the software distribution for Desigo CC containing all the required folders including
- Brand,
- EM folder with the required extensions along with their EULA and other required files/folders, for example, PostInstallation folder containing post-installation steps enabled
- GMS folder containing Languages and Prerequisites folders along with other required files including the post-installation step for LicenseActivatation enabled
- Instructions folder containing the GMS Platform.xml file for the setup type that you want to install along with all the required extensions and their post-installation steps enabled, if any, in order to execute them.
- (Optional) Languages folders for additional language packs
- (Optional) Upgrades folder with subfolders EP and SR containing required files including files for EMs and their languages, SR patch and its languages
- Gms.InstallerSetup.exe.

NOTE:
During a silent or semi-automatic installation, if a Desigo CC EULA or EM EULA is accepted in an XML file, it automatically accepts the EULA. In this case, it is mandatory to hand over the EULA as a file or printout to the end customer and ensure the acceptance of the EULA, duly signed by the end customer.
You want to upgrade the existing installation (V2.1/V3.0/V4.0) for the Setup type – Server/Client/FEP using the silent installation mode. You also want to add new extensions (along with their post-installation steps, if any), new language packs or new installation language.
You also want to have the license for the Desigo CC Server automatically activated. Furthermore, you want to have the project, with the linked HDB, upgraded, started and activated and then display the logon dialog box for working with the Installed Client.
For working with the Windows App Client you want to have the website/web application URL upgraded and the web application linked to the started project.
Furthermore, as a part of the silent installation, you also want to have executed the post-installation steps for extensions selected for installation such as additional software installation, template synchronization, web application creation.
Reference: For background information, see the reference section.
Workflow diagram:
Prerequisites:
- As specified in the installation roadmap, you have referred to the planning checklist.
- Obtained and verified the software distribution setup.
- For setting up the Setup Type – Server/Client/FEP with local web server (IIS), you have installed and configured IIS on the Server/Client/FEP computer.
- Completed the Installation Planning Requirements including installing .Net 4.7.2.
- Acquired the administrative rights on the system where you are performing the silent installation.
- Verified and enabled the GMSPlatform.XML file
- Enabled the required post-installation steps for execution
Steps:
- Select Windows Start menu > All Programs > Accessories and select the Command Prompt menu, right-click on it and then select Run as administrator).
- A User Account Control message may display if your Return User Account Control Settings to Default or Always Notify are set to Default or Always Notify, asking you if you want to allow this installation program to make changes to the computer. Click Yes.
- The Command Prompt displays.
- Run the following command in the Command Prompt:
“<Full path of the file Gms.InstallerSetup.exe>” /q <Full path of the silent Installation XML>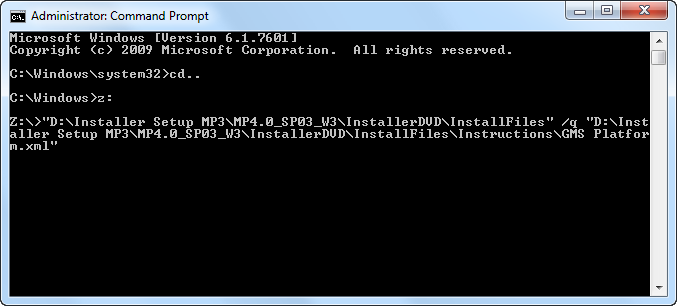
- The Desigo CC icon displays in the taskbar with the notification
Installation started.
As the upgrade proceeds, the taskbar icon tooltip displays in the Notification area. It informs you about the upgrade status including the status of the post-installation steps that are configured.
The taskbar icon also informs you of the automatic restart, if this was configured in the XML file. However, if the installation does not continue after the restart, you must run as administrator the following command in the Command Prompt:<Full path of the file Gms.InstallerSetup.exe> /q <Full path of the silent Installation XML>.
Alternatively, you can get approval from IT to change the UAC settings. (See Changing User Account Control Settings).
- After the silent upgrade and configured post-installation steps are executed, right-click on the taskbar Desigo CC icon to display the following context menu options:
Exit: Click this menu to exit the taskbar. Otherwise, the icon is removed from the taskbar notification area 15 minutes after the installation is completed.
View Log: Click this menu to open the Installer Log file.
- (Optional and applicable only for post-installation step – License Activation) The licenses are upgraded and activated based on the license files (.lic) available and/or Activation/Entitlement IDs specified. You can verify license activation of these files in LMU.
For already active licenses, expired licenses, invalid file format or missing files, and so on a notification is displayed for the notification area icon. For more information, refer to installer log file located, having the extension _SILENT for silent installation, located at the path
[System drive]:\ProgramData\[company name]\GMS\InstallerFramework\GMS_Installer_Log.
- (Optional and applicable only for post-installation step – Project Setup) The already existing active project is upgraded, activated and started by default.
If the History Database was linked to the previously active project, it is also upgraded along with the Long Term Storage, if any.
All the existing web sites and web applications are also upgraded, even if upgrade of the any of the existing web application fails. The already existing certificate is used for securing the communication between the Windows App client and the web server (IIS).
Finally displays the logon dialog box for specifying the credentials.
If there is no already existing project, HDB and website/web application available for upgrade, then the JSON file is referred to for the creation of the project, History database and website/web application. Note that even if the HDB creation/upgrade fails, the post-installation continues with the next step. In that case, you can re-run the post-installation step for HDB creation/upgrade.
For the configured an existing project’s Pmon user/web application user, if the password is expired then the web application upgrade fails and you must manually update the web application using SMC.
For more information, refer to installation log file, having the extension _SILENT for silent installation, located at the path
[System drive]:\ProgramData\[company name]\GMS\InstallerFramework\GMS_Installer_Log.
For any invalid website/web application configuration, missing IIS configuration, invalid domain user and so on, a notification is displayed. For more information, refer to the SMC log when required at the following path
[Installation drive]:\[installation folder]\GMSMainProject\log.
- (Optional and applicable only for post-installation steps of other extensions) The post-installations steps of other extensions, when correctly configured, enabled (modified the .txt file to.xml) are executed as well successfully.
NOTE 1:
During the silent upgrade, the Installer ensures that all parent extensions of the configured extensions are upgraded, even if they are not explicitly mentioned in GMS Platform.xml file.
NOTE 2:
In case any already installed extension is not present in the software distribution, then silent installer will abort the upgrade with the Fatal error.
NOTE 3:
If there is a prerequisite conflict, the Installer, by default, takes the action (Install/Update/Skip/Abort) by selecting the default set option as in the custom installation and resolves the conflict automatically. In case of Abort, please see the Installer Log.
For example, if a higher compatible version of the software is installed, the Installer skips the installation of the prerequisite.
NOTE 4:
If a lower compatible version is installed, then the Installer upgrades the prerequisite, generally for a prerequisite ALM.
However, for a non-mandatory prerequisite, the Installer completes the installation, but fails to install the non-mandatory prerequisite and informs you with a notification in the task bar notification area.
NOTE 5:
If a lower incompatible version is installed, by default, the Installer installs the prerequisite.
NOTE 6:
If the installation fails, you must click Exit in the context menu that displays when you right-click the taskbar icon.