Select Project > Management System > Servers > Main Server >Pager.
The RENO Configurator tab displays.
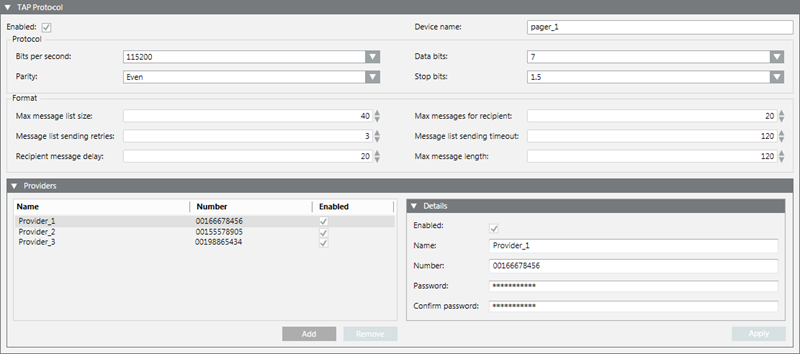
Open the TAP Protocol expander.
Select the Enabled check box. NOTE: If this check box is unavailable (dimmed), open the ESPA protocol expander and disable the ESPA protocol. (Only one paging protocol can be enabled at a time.)
In the Device name field, enter the name of the provider of the paging service.
Refer to the documentation of the connected paging equipment to appropriately configure the following fields in the Protocol panel:
Bits per second
Parity
Data bits
Stop bits
If required, adjust the settings in the following fields in the Format panel:
Max message list size
Message list sending retries
Recipient message delay
Max messages for recipient
Message list sending timeout
Max message length
Open the Providers expander and do one of the following:
If you want to add a new provider, click Add to add a new row to the providers list.
If you want to edit an existing provider, select its name in the providers list.
In the Details expander, do the following: a. Select the Enabled check box to be able to configure the provider. NOTE: If you disable a provider, Desigo CC will not be able to send remote notifications as pager messages to recipients who use that provider. b. In the Name field, enter the name of the service. NOTE: If you modify the name of an existing provider and at least one recipient is using the updated provider, a message box asks if you want to modify this name for the recipient and update this data. Click Yes. c. In the Number field, enter the phone number of the service provider from which the messages will be sent. d.(Optional) If the provider requires authentication, enter values in the following fields: Password and Confirm password. e. Click Apply.
The provider information is updated.
Repeat the previous steps for all the providers you need to add.
(Optional) To remove a provider, select it and click Remove.
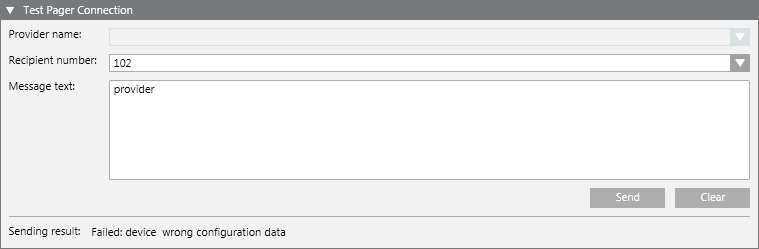
In the Providername drop-down list, select a provider. NOTE: This provider must match that used by the pager message recipient.
In the Recipient number field, select or enter a valid number.
In the Message field, enter the text of the message.
Click Send.
This will send the test pager message. The Sending result at the bottom of the expander shows the outcome and diagnostic information (for example, OK or Failed).
Check that the message is received.
NOTICE
Disabling TAPI
Regardless of whether the pager service is used in the project, to prevent malfunctioning, do not disable the TAPI service in the system.
Information
NOTE: The Desigo CC’s diagnostics automatically detect if there is a problem with the pager protocol (such as, invalid configuration, paging equipment disconnected, and so on), and generate an event to notify you of the fact.
 .
.