Changing Function
Scenario: You want to customize a function.
Reference: For background, information on function, see the reference section.
Workflow diagram:
Prerequisites:
- System Manager is in Engineering mode.
- System Browser is in Management View.
Steps:
A function created by Headquarter can be customized depending on the allowed Customization Levels (Region, Country, or Project).
- Select Project > System Settings > Libraries > L1-Headquarter > BA > [subsystem library].
- Click the Library Configurator tab.
- Click Customize the library to a lower level
 .
.
- A confirmation message is displayed.
- Click OK.
- A library folder is created in the corresponding customization level.
A copy of the selected object is created in the corresponding customization level.
- Select Project > System Settings > Libraries > L1-Headquarter > BA > [subsystem library] > [Function].
- Select the desired function object.
- Click the Models & Functions tab.
- Click Customize .
- A confirmation message is displayed.
- Click OK.
- A function is created in the corresponding customization level.
- You have saved a function and defined the presets.
- Select Project > System Settings > Libraries > L1-Headquarter > BA > [subsystem library] > Functions.
- Select the Models & Functions tab.
- Open the Properties expander.
- Click Add.
- Enter the property for a name, for example, Value.
- Click OK.
- Click Save
 .
.
- All basic properties as well as the default property are defined.

NOTE:
All created property entries must still be configured individually. Go to the workflows for assigning symbols, configuring details and configuring alarms.
- Select the property.
- Define the properties for VL, AL, DL1, DL2, Status and Property Group.
- Click Save .
- All basic properties as well as the default property are defined.
- Select the corresponding property.
- Drag-and-drop the property to the desired location.
- Repeat the process for all properties to be moved.
- Click Save .
- The properties are in the proper sequence.

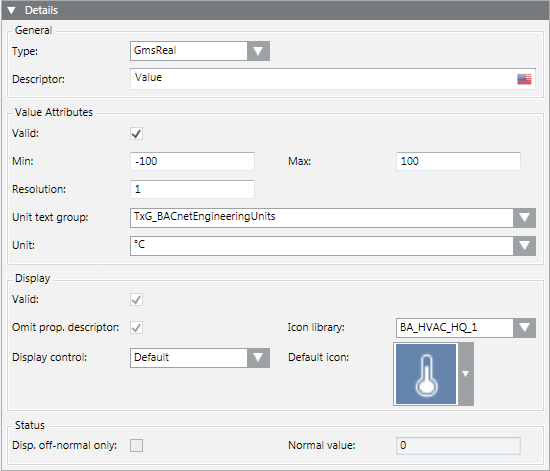
- Open the Details expander.
- In the General group box, select a type and enter a description.
- Define the data point attributes under Value Attributes and select a text group.
- Define the view response under Display.
- Define the off-normal status under Status.
NOTE: You can define the status only if Status is selected in the Properties expander.
- Repeat the steps for all properties.
- Click Save .
- You have selected an object model or function in System Browser.
- The Symbols expander is open.
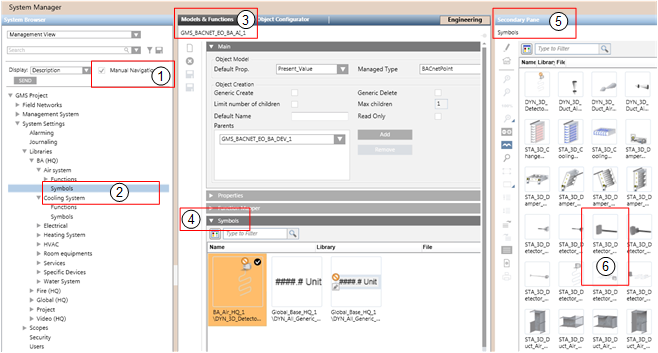
- In System Browser, select the Manual Navigation check box.
- Select Project > System Settings > Libraries > L1-Headquarter > BA > [Subsystem library].
- Select the Models & Functions tab.
- Open the Symbols expander.
- Select the corresponding Symbols library.
- Right-click the symbol library and select the Secondary pane.
- The Secondary pane opens and displays available symbols.
- Select the desired symbol and drag-and-drop it to the Symbols expander (left-click and hold).
- Repeat step 7 for all symbols you want to assign to this object model or function.
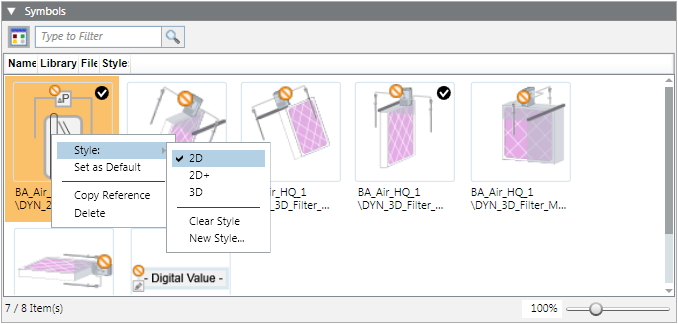
- To define the library style, right-click the desired symbol and select Style: > 2D, 2D+ or 3D.
- To define the default symbol for each library style, right-click the desired symbol and select Set as Default.
- Click Save .
- The symbols are assigned to the object model or function.
- The library style is defined for each symbol.
- The default symbol for each library style is defined.
NOTE:
During graphics engineering the symbol designated as the default symbol is dragged-and-dropped to a data point where the graphic is placed.
- Select the Manual Navigation check box.
- Select Project > System Settings > Libraries > [object model or function].
- Open the Graphic Templates expander.
- Select the corresponding Graphic Templates library.
- Right-click the Graphic Templates library and select Secondary pane.
- The Secondary pane opens and displays available graphic templates.
- Select the desired graphic template and drag-and-drop it to the Graphic Templates expander.
- Repeat step 6 for all graphic templates you want to assign to this object model or function.
- Define the default graphic template. Right-click the desired graphic template and select Set as Default.
- Click Save .
- The graphic templates are assigned to the object model or function.
- The default graphic template is defined.
NOTE:
During graphics engineering the graphic template designated as the default graphic template is dragged and dropped to a data point where the graphic is placed.