Additional Procedures
Create a Folder for a Field System Alarm Table
- Select Project > System Settings > Libraries > [L1-Headquarter, L2-Region, L3-Country or L4-Project] > BA > [subsystem type].
- Click the Object Configuration tab.
- Click New Object
 .
.
- Select New Driver Alarm Table Folder.
- Type a name and description for the folder.
- Click OK.
- A folder is created for the alarm table.

NOTE:
Only one alarm folder can be created within a library. Multiple alarm tables may, however, be defined in this alarm folder.
Select an Alarm Table and Change the Alarm Driver
- You have customized the alarm table folder.
- Select Project > System Settings > Libraries > [L2-Region, L3-Country or L4-Project] > BA > Device > [BACnet] > Alarm Tables > [Alarm driver].
NOTE: The folder path may vary by subsystem.
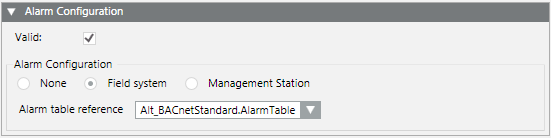
- In the Alarm Configuration expander, select Field system.
- Select an alarm table under Table kind.
NOTE: This table structure is preconfigured and cannot be changed.
- The columns are displayed as per the selected alarm table structure.
- Click Save
 .
.
Copy an Alarm Table (Save as)
- You have customized the alarm table folder.
- Select Project > System Settings > Libraries > [L1-Headquarter, L2-Region, L3-Country or L4-Project] > BA > [subsystem type] > [alarm table] > [alarm table Driver].
- The alarm table opens.
NOTE: First save the new alarm table prior to changing the properties.
- Click Save As
 .
.
- The Save Object as dialog box opens.
- Select Project > System Settings > Libraries > [L2-Region, L3-Country or L4-Project] > BA > [Subsytemtype] > [Alarmtable].
- Type a new name and description for the new alarm table.
- Click OK.
- The new alarm table is saved in the corresponding folder.
- In the Alarm Configuration expander, select the appropriate properties.
- Click Save .
NOTE: You must first stop and restart the driver to activate the edited table.
Supported Operands | ||
Operand | Meaning | Example |
| | | Or |
|
!| | | Nor |
|
.. | In the range of two values |
|
!.. | Not in the range of two values |
|
> | Greater than |
|
< | Less than |
|
>= | Greater than or equal to |
|
<= | Less than or equal to |
|


Fault indication
- The first value must be less than the second value. A valid value must be less than or equal to 30.
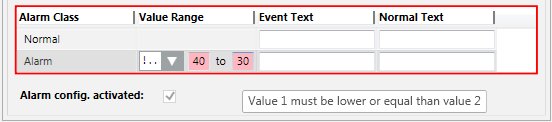
- The value sequence is not ascending. A valid value must be less than 50.

Create a New Alarm Table
- You have customized the alarm table folder.
- Select Project > System Settings > Libraries > [L2-Region, L3-Country or L4-Project] > BA > Device > [BACnet] > Alarm Tables.
NOTE: The folder path may vary by subsystem.
- Click New Alarm Table .
- Type a Name and Description for the alarm table.
- Click OK.
- Select Field system.
- An empty field system alarm table is created.
- Click Save .
Configure/Edit an Alarm Table
- You have created and opened an empty alarm table.
- Click New.
- A new configuration line is added.
- In the Alarm Class column, select the alarm class.
- Define the individual conditions for each column.
- Repeat Steps 2 and 3 for each additional alarm class.
- Click Save .
NOTE: You must first stop and restart the driver to activate the edited table.
- The alarm table is configured.

NOTE:
A newly created alarm table can now be assigned to the Object Model. Existing alarm tables are automatically updated at the Object Model.
Inheritance Rules for Object Model, Function, and Object | ||
Icon | Color | Description |
| White | No value is inherited. |
| Grey | The project instance value is inherited. |
| Green | The Function inherits the value. |
| Blue | The Object Model inherits the value. |
| Question mark with a yellow background. | The value is undefined until the instance is saved. |


While you change inheritance properties, you cannot disable an inheritance. As a result, the state changes from  to
to  or
or  when editing. This display for the inheritance function is used for the Main, Properties, Details, and Alarm Configuration expander.
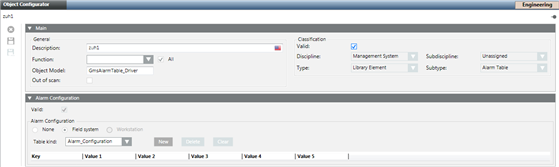
Assign an Alarm Table to an Object Model
- An Object Model is selected in System Browser.
- The Properties and the Alarm Configuration expanders are opened.
- The properties were defined in the Main and Properties expanders.
- In the Properties expander, select the property (for example, Alarm, Fault).
- In the Alarm Configuration expander, select the Valid check box.
- Select Field system option.
- In the Alarm table reference, select the corresponding alarm table.
- Repeat Steps 1 to 4 as needed for additional properties.
- Click Save .
- Displays the Alarm Configuration expander.
Example: Alarm Table
Delete an Alarm Table
Scenario: You have created and configured an alarm table that you no longer need.
- Select Project > System Settings > Libraries > [L2-Region, L3-Country or L4-Project] > BA > [subsystem type] > [alarm table] > [alarm table driver].
- The alarm table driver opens.
- Click Delete
 .
.
- Click Yes.
- Click Yes.