Modifying Alarm Table
This section provides instructions on configuring alarms so that the correct alarm class is displayed on the Alarm Summary Bar.
Alarm Table Standard Configuration. | ||
Object | Alarm Setting | Validity Info |
Object model | Default | Valid |
Device | Alarm table | Valid |
Data point instance | Default | Invalid |
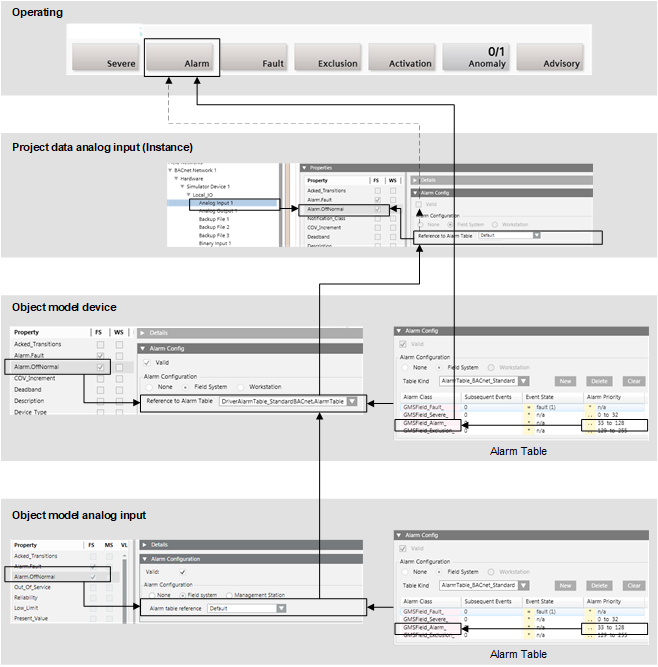
Check Notification Class
The notification class must be properly set up in the subsystem to display it correctly on the Alarm Overview Bar. This occurs at the individual data point as well as on the notification class (NC) object.
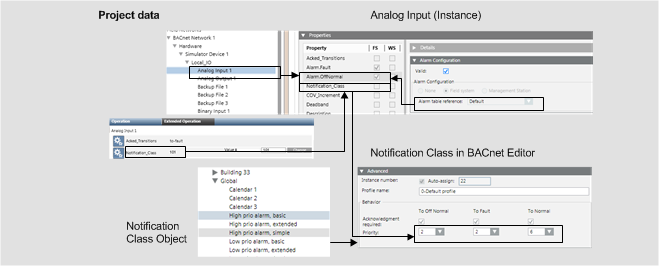

NOTE:
There are subsystems that automatically calculate the notification class from the alarm function and alarm class. The notification class cannot be edited on the alarm object in this case. Change the alarm function or alarm class to receive another notification class.
Scenario: You want to customize an alarm table and assign it to a device.
Reference: For general information on object models, see the reference section.
Workflow diagram:
Prerequisites:
- System Manager is in Engineering mode.
- System Browser is in Management View.
Steps:
An alarm table created by headquarter can be customized depending on the allowed Customization Levels level (Region, Country, or Project). A copy of the selected object is created in the corresponding customization level.
- You are authorized to handle libraries for a specific customization level.
NOTE: If the folder structure in the customized area does not exist, Steps 2 through 6 must be performed.
- Select Project > System Settings > Libraries > L1-Headquarter > BA > Device.
- Select the desired subsystem.
- Click the Library Configuration tab.
- Click Customize Function
 .
.
- A confirmation message is displayed.
- Click OK.
- Empty folders are created in the corresponding customization level.
- Select Project > System Settings > Libraries > L1-Headquarter > BA > Device > [subsystem type].
- Select the desired alarm table.
- Click Save As
 .
.
- In the Save Object As dialog box, do the following:
a. Select the location in the tree, for example, Project > System Settings > Libraries > [L2-Region, L3-Country or L4-Project ] > BA > Device > [subsystem type] > Alarm Tables.
b. Enter a name and description.
c. Click OK.
- A copy of the alarm table is created.
- Edit the alarm table as needed.
- Click Save
 .
.
Supported Operands | ||
Operand | Meaning | Example |
| | | Or |
|
!| | | Nor |
|
.. | In the range of two values |
|
!.. | Not in the range of two values |
|
> | Greater than |
|
< | Less than |
|
>= | Greater than or equal to |
|
<= | Less than or equal to |
|


Fault indication
- The first value must be less than the second value. A valid value must be less than or equal to 30.
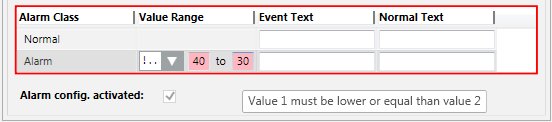
- The value sequence is not ascending. A valid value must be less than 50.

- Select Project > Field Networks > [Network name] > Hardware > [Device].
- In the Object Configurator tab, open the Properties expander.
- Select the Alarm.OffNormal property or another alarm property.
- In the Alarm Configuration expander, select the Valid checkbox (blue is displayed).
- Select the Field System option and the corresponding Alarm Table from the drop-down list.
- (Optional) Repeat the assignment of a new alarm table for all appropriate devices.
NOTE:
If the Valid checkbox is displayed in gray (see Color Coded Checkboxes), the library entries for Object Model and Function are not considered.
Inheritance Rules for Object Model, Function, and Object | ||
Icon | Color | Description |
| White | No value is inherited. |
| Grey | The project instance value is inherited. |
| Green | The Function inherits the value. |
| Blue | The Object Model inherits the value. |
| Question mark with a yellow background. | The value is undefined until the instance is saved. |


While you change inheritance properties, you cannot disable an inheritance. As a result, the state changes from  to
to  or
or  when editing. This display for the inheritance function is used for the Main, Properties, Details, and Alarm Configuration expander.