Scenario: You want to configure a group of cameras that can be accessed with a single action. For example, if a group of cameras is set up for each floor of a building, an operator can quickly view the cameras of an entire floor by simply selecting its camera group.
Skip this section if you want to modify an existing camera group.
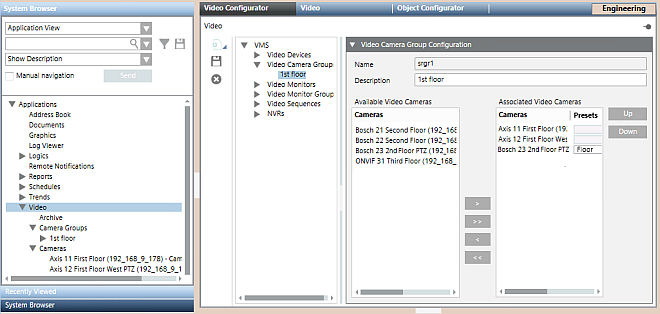
In System Browser, select Application > Video.
In the Video Configurator tab, select VMS >Video Camera Groups.
Click New, and select Add a New Video Camera Group.
In the Video Camera Group Configuration expander, enter a Description for the camera group. NOTE: The following characters are not allowed in the Description text: “.” (period), “:” (colon), “?” (question mark), “*” (asterisk).
Click Save .
The new camera group node is created in the Video Camera Groups folder of the VMS tree.
The new camera group also appears in the Camera Groups folder of System Browser.
To Delete a Camera Group
Complete these steps to remove a camera group that is no longer needed. This will not delete any of the cameras included in the group.
In the Video Configurator tab, select VMS >Video Camera Groups > [camera group].
Click .
The camera group is removed from the Video Camera Groups folder of the VMS tree.
The camera group is also removed from the Camera Groups folder of System Browser.
 , and select Add a New Video Camera Group.
 .
. .
.  or
or  to add more cameras to this group.
 or
or  to remove cameras from this group.