Integrating Video Surveillance
Scenario: You want to configure a Desigo CC management platform to support video surveillance. This requires two separate software components:
- A Video Management System (VMS), which handles the physical connection to video devices and supports video services.
- The Video extension module, which enables the management platform to interface with the VMS.
This section covers how to install and set up the VMS and Video extension, and prepare a Desigo CC project with video.
Reference: For background information, see the reference section.
Workflow diagram:
Prerequisites:
- You installed the Desigo CC software and started up a project.
Steps:
- Install all the video devices (cameras and so on) in the field.
- Install the VMS server:
- For the Milestone or Siveillance VMS, see Installing the VMS Server.
- For other VMS providers, see the separate documentation.
- Correctly configure all the video devices in the VMS:
- For the Milestone or Siveillance VMS, see Configuring Video Devices in the VMS.
- For other VMS providers, see the separate documentation.
Perform this procedure if the video extension is not yet installed on the Desigo CC server station, or if you want to upgrade it to a newer version.
- You are logged into Windows with admin rights.
- Exit Desigo CC and, in SMC, stop the project.
Check if the Video Extension is Installed
- In the Windows desktop, right click Update Desigo CC
 and select Run as administrator.
- The Install Wizard displays.
- Click Next.
- In the Setup Type Selection dialog box, click Modify alongside Feature Selection.
- In the Feature Selection dialog box, expand the Security extension suite and look for Video Management.
- If Security and Video Management are both listed, and you do not want to install a newer version, skip to the end of this procedure.
Install or Upgrade the Video Extension
- In the Feature Selection dialog box, click Add Em.
- In the Browse for Folder dialog box, locate and select the folder containing the video extension package. For example, […] > [setup folder] > InstallFiles > EM > VIDEO.
- Click OK.
- If the Video Management extension was not previously installed, you will find it now added to the list in the Feature Selection dialog box.
- Click OK.
- In the Setup Type Selection dialog box, click Next.
- If an Upgrade Selection dialog box displays, make sure both Security and Video Management are selected.
- Click Next and follow the on-screen prompts to finish installing or updating the video extension.
- When finished, the Installation Complete dialog box displays.
- Click Close.
- The Video Management extension is installed or upgraded.
Do this procedure to check whether the video extension module is present in a project, and to add it if needed.
NOTE: Once you have added an extension to a project you cannot remove it. Only add the necessary extensions to a project.
- You are logged into Windows with admin rights.
- The video extension is installed.
- Start SMC.
- In the SMC tree, select Projects > [project].
NOTE: This should be the project where you want to use video surveillance. Only one project can have a video connection, and the VMS can be connected to one project only.
- In the Project Settings tab, open the Extension Information expander and look for Video Management in the list of the project’s extension modules.
- If Video Management is included in the list and its status is
Updated, the project already includes the necessary extension and you can skip to the end of this procedure. Otherwise continue with the steps below.
- If the Project status in the Server Project Information expander is
Started, stop the project as follows:
a. Click Stop .
.
b. Click OK.
- The status bar at the bottom of the screen displays
Project is Stopping, and the Project status changes toStopped.
- If Video Management is listed in the Extension Information expander but its status is Outdated, click Upgrade
 .
.
- The project upgrades, which may take several minutes. Check the progress bar at the bottom of the screen. Once finished,
Upgrade successfuldisplays.
- If Video Management is not listed in the Extension Information expander, add it to the project as follows:
a. Click (+) Add to project.
b. In the Select Project Extensions dialog box, expand Security.
c. Select the Video Management check box.
d. Click OK.
NOTE: In the Video Services Settings expander, for now leave the default settings. These will be configured if needed in the next procedure.
e. Click Save Project .
.
- The extension is added. Once finished,
Extensions added successfullydisplays.
Do this procedure to set up the link between the Video Management System (VMS) and a Desigo CC project.
- The VMS server is installed.
- The Video extension was added to the project..
- Exit Desigo CC and start the System Management Console (SMC).
- In the SMC tree select Projects > [project].
- Click Stop .
- Click Edit
 .
.
- The Project Settings tab displays.
- Click Next
 until the Video Services Settings expander displays.
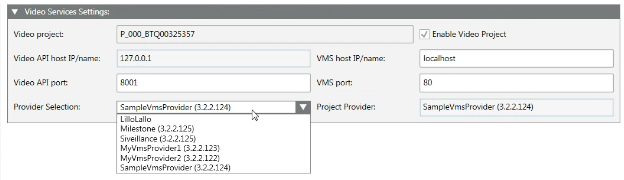
- Configure the Desigo CC side as follows:
- Enable video project: Select this flag, unless you are creating an additional project for a distributed system, and you want video to be enabled in another project. See Project Settings for Management Platform Distribution, below.
NOTE: Removing this flag later will result in deleting all video information from the project.
- Video API host IP/name: The IP address or name of the video interface computer, fixed to localhost (the Video API always runs on the Desigo CC server computer).
- Video API port: The TCP communication port for the video interface, typically set to
8001.
- Configure the VMS side as follows:
- Provider selection: From the drop-down list of available providers, select the VMS provider that you want to use.
NOTE: If editing an existing or restored project, the Project provider field indicates the original provider used for the project. Data loss may result if in you switch to a different provider that is incompatible. See VMS Provider Misalignment, below.
- VMS host IP/name: the name or IP address of the computer where the VMS was installed. (For the Siveillance / Milestone VMS, see Installing the VMS Server.)
NOTE: Do not use localhost here, even if the VMS runs on the same computer as the Desigo CC server. This setting is also used by networked client stations to access VMS video streams, and so must specify the server name or IP address.
- VMS port: the TCP communication port for the VMS, default value is 80.
- Click Save Project .
- Click Activate Project
 .
.
- Click Start Project
 .
.
- You are now able to start the Desigo CC client application.
VMS Provider Misalignment
In the Provider selection drop-down list, you can set which is the currently running video provider. This must correspond or be compatible with the video provider used for the project.
NOTE: The Siveillance and Milestone providers are equivalent and so do not generate any misalignment.
- For a new video project, the provider chosen in Provider selection becomes the new active provider. If this is different from the current active provider, you get a warning that video configuration data may be lost as a result of changing provider. After saving, a read-only Project provider field is created with value that matches the Provider selection.
- In an existing video project, if you change the Provider selection so it no longer matches the Project provider:
- The Project provider field turns red to indicate the mismatch.
- On saving the project, you get a warning that the video configuration data may be lost (if the new provider is not compatible with the previous one).
- If you choose to proceed anyway, the Project provider field is updated.
- When you start the project, the video system is automatically disconnected, with a
Misaligned Video Providersevent. This is to avoid possible data loss, since the project provider has been changed. - If you are sure you want to proceed, issue a manual Connect command to make the new project provider effective.
- In a restored video project, the Project provider field indicates the VMS provider originally used for that project. For projects prior to video 4.1, the provider is always
Siveillance(x.x.x.x).If the current Provider selection is not the same, you can do one of the following: - After restoring (and if necessary upgrading), edit the project to settings to change the Provider selection to match the restored project’s Project provider.
- Retain the current Provider selection. This will cause an automatic video system disconnect with
Misaligned Video Providersevent. You can then proceed anyway (with possible risk of data loss in case of incompatibility) by manually forcing a connect of the video system.
Project Settings for Management Platform Distribution
In SMC, only one project can have a video connection, and the VMS can be connected to one project only. If the installation includes multiple Desigo CC servers, only one is connected to the VMS.
The other Desigo CC servers can still support all the normal operating video functions (display or record video streams, control cameras, associate cameras to system objects, video steps in assisted treatment, and so on), but without a direct connection. For this, the video extension needs to be installed, and the required SMC settings configured as follows:
Required SMC Settings | Main Desigo CC server connected to VMS (supports all video functions) | Additional Desigo CC server that supports: | ||
No video functions | Video functions without video steps in operating procedures | Video functions with video steps in operating procedures | ||
Install the video extension | Yes | No | Yes | Yes |
Include video in the project | Yes | No | No | Yes |
Select Enable video project | Yes | No | No | No |
For the Siveillance or Milestone VMS, complete the following steps.
- Set up a named account for the Video API and for Desigo CC services: Configuring the VideoApiService Account .
- Set up permissions for video streaming: Configuring VideoStreaming Users
- Configure other network settings between Desigo CC and the VMS: Setting up Networking for the VMS.
For other VMS providers, refer to the separate documentation to ensure that proper communication is established between Desigo CC and the VMS.

NOTE:
The installed video devices must be configured and running properly in the VMS (for Milestone or Siveillance, see Configuring Video Devices in the VMS) before connecting it to Desigo CC.
- Set the transaction mode to simple. See Switching the Transaction Mode for Video Engineering.
- On the Desigo CC station, enable application rights for video. See Video License and Application Rights.
- Connect Desigo CC to the video management system. See Connecting the Video System.
- Refresh the cameras configuration. See Refreshing the Cameras Configuration.
- The cameras configuration is acquired in System Browser, and Desigo CC is able to Display Images from a Camera in the First Monitor in System Manager..
- Set the transaction mode back to logging. See Switching the Transaction Mode for Video Engineering.

Once the video configuration is acquired into Desigo CC, you may need to make the following additional adjustments:
- Limiting Motion Detection Events. Do this to avoid excessive alarm traffic arising from camera motion detection.
- Excluding Cameras from the Project. Do this you want to manage only a subset of the VMS cameras from Desigo CC.