Advanced Reporting

Advanced Reporting allows you to create graphical reports using elements such as charts, graphs, pie charts, images and so on. In order to work with Advanced Reporting, you must install the Advanced Reporting extension and add it to the management station project.
The management station standard Reporting does not support the elements of Advanced Reporting. Advanced Reporting uses advanced capabilities such as grouping, and OLAP Cube to generate such reports.
Advanced Reports are used for reporting data or data series from Desigo CC historic data combined with additional features such as:
- Comparisons
- Benchmarking
- Evaluations
- Calculations
- Hyperlinks
- Enhancements with other data, for example, electricity rate, KPI
These reports provide an output in the HTML format and allow you to save the report data in the following formats:
- Excel
- DOCX
Advanced Reporting reports can display data in any of the languages that are configured in your system. However, you can only view the report output in your logged-in language.
This section provides background information on Advanced Reporting of Desigo CC. For related procedures, see the step-by-step section.
The Configuration Page - Advanced Reporting displays the configuration status of advanced reporting on your system. It also provides options to further optimize the configuration settings.
This page displays the configuration according to the Simple or Advanced configurations. You can select the Simple or Advanced configurations by clicking Simple or Advanced on the page.
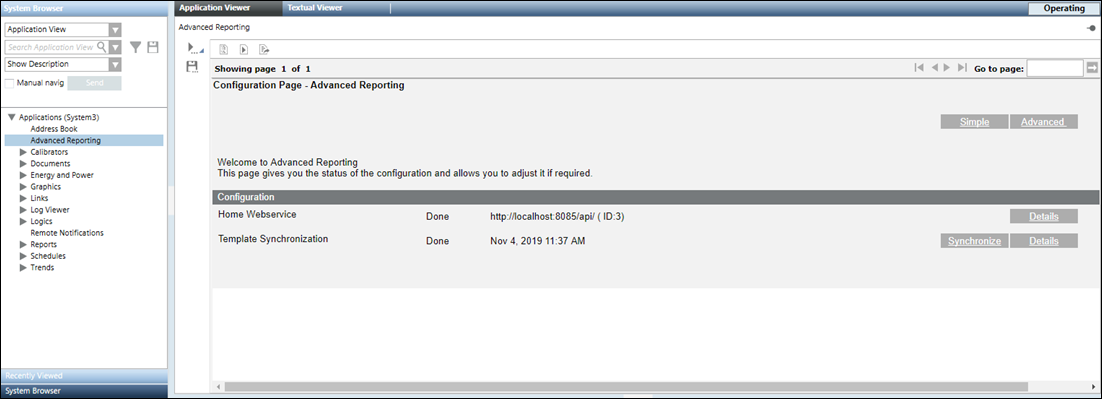
- The Simple configuration is applicable when you have installed only the Advanced Reporting extension and need to perform the basic configurations such as 5 – Configure the URL for Web Services and 6 – Synchronize Advanced Reporting Templates.
Simple Configuration | |
Name | Description |
URL of the management station web services that updates the WSI URL in all the report templates provided by the management station. | |
Details | Displays the details of the Web Services URL along with options Add, Delete and Hide the URL. |
Date and time when the report templates were transferred to the Tomcat server. | |
Synchronize | Deploys the report templates from the library to the Tomcat server. |
- The Advanced configuration is applicable when want to work with creating reports related to caching, consumption, and so on for which you need additional configurations such as caching settings, layout settings, settings for configuring the look and feel of the report elements, and so on. For more information, see Energy Reporting and Pharma Reporting extension help.
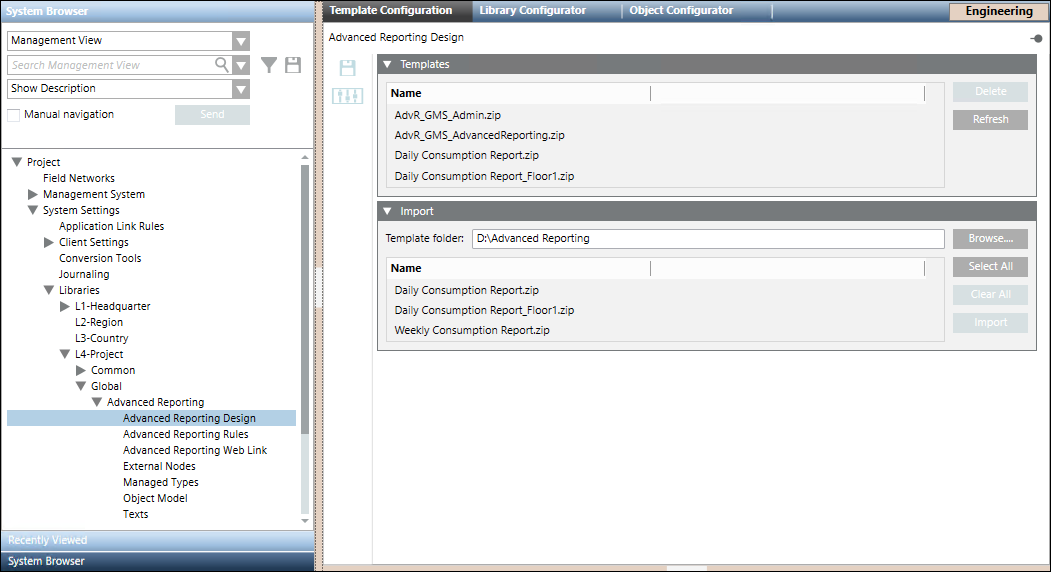
Whenever the Advanced Reporting extension is installed, the Advanced Reporting libraries are equipped with certain pre-configured report templates. (see Configure Reporting Templates)
You can either use these templates as is, or can further configure them as required. After further configuration, these templates can be deployed back to the respective libraries using the Template Configuration application. In addition to configuring pre-configured templates, you can also add new templates to these libraries using this application. Procedures relating to modifying existing templates or adding new templates to these libraries are performed by Librarians.
Using the Templates expander you can add the report templates to the respective library on the management station. It lists the report templates files that you import using the Import expander.
- Delete: Deletes a selected template.
- Refresh: Refreshes the Templates expander.
Using the Import expander you can work with the report templates using the following buttons:
- Browse: Displays the Browse folder. Select the folder where the zipped files of the BIRT report templates are present.
- Select All: Selects all the listed files.
- Clear All: Clears the files listed in the Import expander.
- Import: Imports the selected files and saves them in the Advanced Reporting folder in the selected library in the customer project.
The toolbar provides you with the following icons:
- Save: Saves the Advanced Reporting folder in the selected library of the customer project to match the number of template files in the Templates expander.
Whenever you delete a template file from the Templates expander, you must click Save in order to delete the file from the Advanced Reporting folder in the selected library.
 - Customize: Customizes the BIRT templates according to the customization level.
The post installation steps of Advanced Reporting is used to configure the following:
- Install Apache Tomcat and Advanced Reporting BIRT Extensions (Post Installation step Advanced Report BIRT Extension Installation)
- Create an Advanced Report web application (Advanced Report Web Application)
- Deploy the Advanced Reporting templates from the Advanced Reporting library to the Tomcat Server (Advanced Report Template Synchronization)
Considerations for Post Installation Step: Advanced Reporting
- You must download and install the JRE before proceeding with the installation of Advanced Reporting using post installation steps.
- Verify that the value provided for attribute TargetName in the file TomCatInstallConfiguration.json located at the path
…\InstallerDVD\InstallFiles\EM\Advanced_Reporting\PostInstallation\AddSWInstallation
is the System ID of the customer project that you are about to install. For more information, contact customer support. - Verify the post installation steps configured in the Advanced_ReportingPostInstallationConfig.txt file located at
…\InstallerDVD\InstallFiles\EM\Advanced_Reporting\PostInstallation for Custom, Semi, or Silent installation. - (Applicable only when executing the Advanced Reporting post installation steps using Semi-automatic and Silent installation) Configure the Advanced Reporting post installation steps in the <EMs> section of the GMS Platform.xml file as follows:
- <EM Name="Advanced_Reporting">
<PostInstallationSteps>
<Step Name="AutomaticAdvRptWebAppCreation" Execute="True"/>
< Step Name="SilentInstallationAdvRptBIRTExtn” Execute = “True”/>
<Step Name="TemplateSynchronization” Execute = “True”/>
</PostInstallationSteps>
</EM> - Verify the values configured for the attribute Execute as specified in the following table.
Installation Type | GMS Platform.xml file | Post Installation Configuration in |
Custom | NA | Execute = AskUser |
Semi automatic | EM > EM Name, PostInstallationSteps | Execute = AskUser |
Silent | (Applicable only when you have specified Execute = AskUser in the Advanced_ReportingPostInstallationConfig.xml file) | Execute = Always |
Verify and Enable the Advanced Reporting Post Installation Steps
- For the configuration of the post installation steps, the default ports (for example for website creation, WSI web application creation, and the Advanced Reporting web application creation) are considered.
- In the TomCatInstallConfiguration.json file available at the path
…InstallerDVD\InstallFiles\EM\Advanced_Reporting\PostInstallation\AddSWInstallation, ensure that the value for the attribute TargetName is the System ID of the customer project that you are about to install.
- Enable the Advanced_ReportingPostInstallationConfig.txt located at the path
…\InstallerDVD\InstallFiles\EM\Advanced_Reporting\PostInstallation by modifying the extension from .txt to .xml.
- Proceed with the management station installation along with the Advanced Reporting post installation steps execution. (see Install the Management Station)
- After the successful installation, Advanced Reporting post installation steps are also executed successfully.
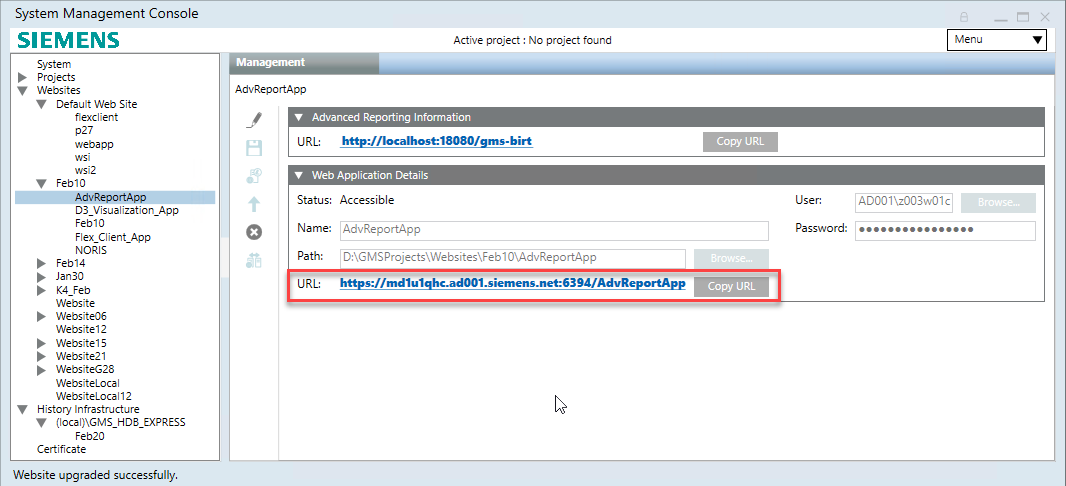
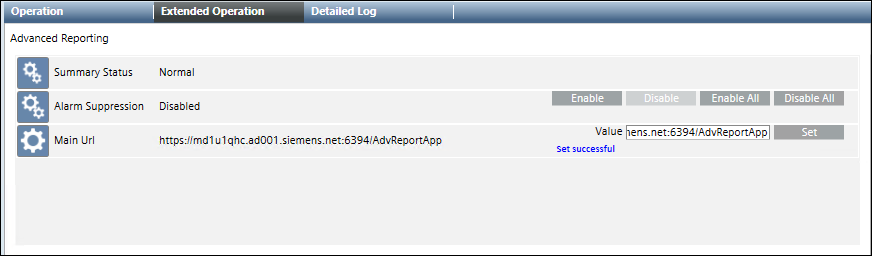
- For working with Advanced Reporting using a Web/Windows App Client on remote computer, you must manually set the MainURL as the Advanced Reporting web application URL (https URL that displays in the Web Application Details expander). For more information, see 4 – Configure the Main URL for Advanced Reporting.
- Log onto the remote computer and import the website/web application certificate (recommended is self-signed certificate) in the appropriate Windows Certificate store. (see Import a Certificate in the Windows Store in Setting the Certificates as Default Certificates.).
- Launch Web/Windows App Client to work with the Advanced Reporting.
- Next, you can proceed with the configuration of reports based on Advanced Reporting setup. (for example, you can proceed with the execution of reports such as Load Profile or pharma reports)
For other additional energy reports, such as consumption, you need to first generate the cache.
For more information, see Energy Reporting extension help.

NOTE:
If you install Advanced Reporting extension along with post installation steps after the Desigo CC installation and project creation, then the post installation step of 6 – Synchronize Advanced Reporting Templates is not executed, and you must manually perform this step using the Configuration Page - Advanced Reporting.
Problem: Tomcat service fails to start, if it is manually restarted or on restarting the machine.
Cause: JRE is upgraded to a higher version by auto update.
Solution:
- Check if the version of JRE home in the environment variables matches with the installed JRE version.
- You can check the installed JRE version by navigating to the following folder ..\Program Files\Java. The name of the JRE folder, for example, jre1.8.0_131, below the Java folder indicates the installed JRE version.
- To check the version of JRE home in environment variables, navigate to the Control Panel > System > Advanced System Settings. In the System Properties dialog box, click Environment Variables. In the System variables section, search for JRE_Home. The version of the JRE_Home environment variable displays in the Value column.
- Check if the version of the JRE_Home variable matches with the version of the installed JRE.
- If the value of the JRE_Home is different, then set its version to that of the installed JRE version. For example, JRE_HOME=..\Program Files\Java\jre1.8.0_131.
- Navigate to ..\Program Files\Apache Software Foundation\Tomcat 9.0\bin and run the Tomcat9w.exe file.
- In the Apache Tomcat 9.0 Tomcat9 Properties dialog box, click the Java tab and set the value of the Java Virtual Machine to ..\Program Files\Java\jre1.8.0_131\bin\server\jvm.dll.
- Restart the Tomcat service.
Problem: Tomcat service fails to start, if CCom port is running on the port number 8005.
Cause: CCom port is using the port number 8005.
Solution:
Ensure that the CCom port is not running on the port number 8005.
No Access to View Reports
Problem: The message No access to view this report displays when executing a report.
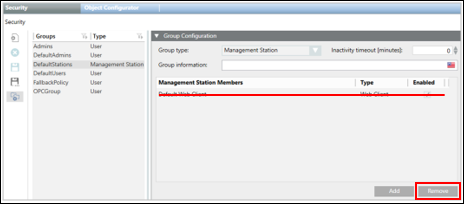
Cause 1: When you run an Advanced Report in the Application Viewer you are actually running it under the Default Web Client with its assigned scope and application rights. This applies also to the Advanced Reporting - Configuration Page. In the case of the HQ TBS, BA and FS project templates the Default Web Client is associated with the DefaultStations security group. This Management Station security group uses the Default Authorization Scope and reduced application rights to restrict the rights when accessing the project with a Web Client. In the case of HQ TBS, BA and FS project templates, the Application View , for example, is excluded. This is why the system denies the Default Web Client access to the Application View.
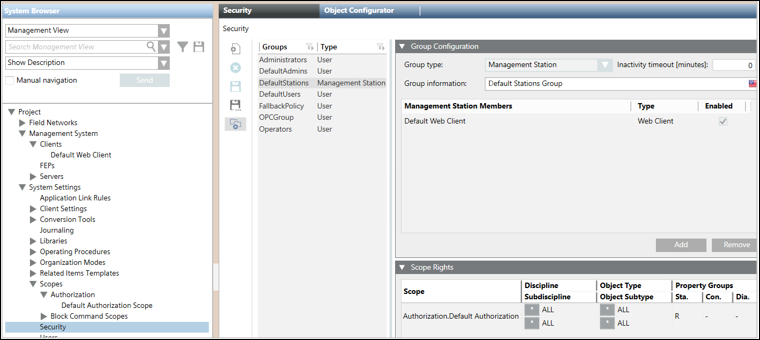

Solution 1: Remove the Default Web Client from the DefaultStations security group.
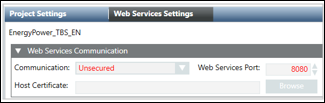
Cause 2: Status of the Web Services (WSI) service in the Manager Details expander of the project in SMC is Initializing.

Solution 2: In case there are several running projects on the same server (SMC), verify that each project has a unique Web Service port number.
Cause 3: Status of the Web Services (WSI) service in the Manager Details expander of the project in SMC is Stopped (and possibly Mode = manual).
Solution 3: Open WinCC OA Console and fix the issue.
Error When Downloading the WebClient
Problem: The following error message displays when downloading the webclient.
Solution:
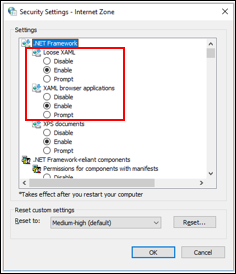
- Check if XAML is enabled in Internet Options.
- Restart Internet Explorer and try once again.
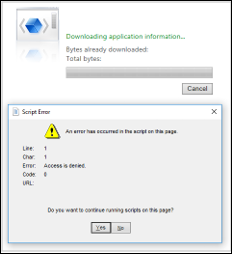
Display of Script Error
Problem: Script error displays on accessing the advanced / energy / pharma report in Application Viewer from the Remote Client.
Cause: Internet Explorer classified the web application as unsafe and denied access.
Solution:
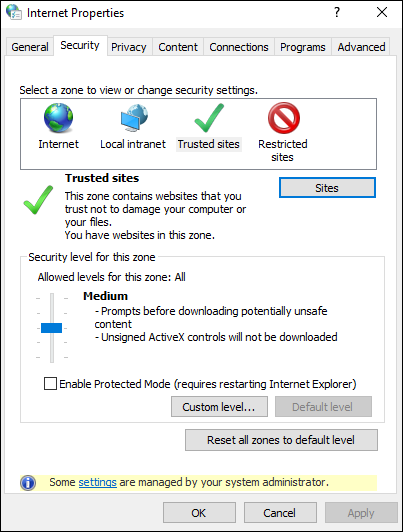
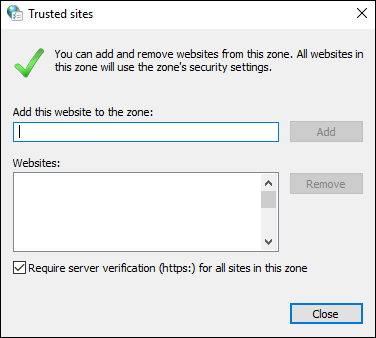
Open Internet Options and add your website / web application URL to Trusted Sites.
Media Group Selection in the Parameter Dialog Box does not show Expected Values
Problem: Media Group selection in the Parameter dialog box does not show expected values.
Cause: The Default Web Client's Management Station Security Group restricts the access.
Solution: Remove the Default Web Client from the DefaultStations Security Group to grant access. (See No Access to View Reports for more information).
Generated Report Cannot be Opened with a Link, Macro, or Reaction
Problem: Generated report cannot be opened with a Link, Macro, or Reaction
Cause 1: The Credentials of Link is not set or is invalid.
Solution 1: Navigate to the Link and set credentials in Application Viewer with an account that has full system access rights.
Cause 2: The file format property of the link (P2 Value) is not the same as set in Execute expander of link or command column of the macro or reaction.
Solution 2: Ensure that the file format is the same everywhere.